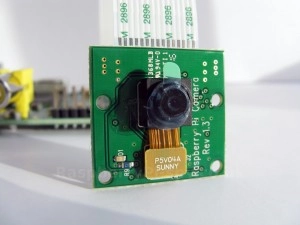
Review: Raspberry Pi Camera Board
My review of the Raspberry Pi Camera Board, a useful camera for the Raspberry Pi
I scored this a 5 / 5
I wanted to write up a review of the Raspberry Pi Camera Board which I have been playing with for the last few weeks.
Raspberry Pi Camera Board?
Surely I mean like just a webcam right? Wrong! The Raspberry Pi comes with a slot (the CSI port) specifically to have something like a camera attached to it.
This means a couple of things;
- No need to waste a precious USB slot on a camera. By default my model of the Pi only has 2 USB ports, permanently having a camera in one would be a big inconvenience.
- No need to worry about 3rd party drivers. Hardware support for cameras that connect this was is built into the Pi. To start using the camera, connect it and enable it from your Pi settings page.

What I got with my Camera
I got the camera module from Element14/Newark. The camera comes as one unit, so as you can see in the picture above you get the camera, mounted to a small board and attached to it is a ribbon which you then attach to the CSI board.
## Installation Process
The Installation Process was very straight forward, I followed the official guide and was up and running in minutes.
My thoughts on the Raspberry Pi Camera Board
For the price (about £20) the camera is a great spec, and installation was a breeze. The fact there are native Rasbian applications that talk directly to the camera is a huge plus and if you like coding in Python there are well documented libraries for that also.
I would happily recommend this camera to folk who own a Pi who either want a new project to play with or have a specific use case in mind.
Uses for the Camera
One of the things I ended up doing with the camera is creating a small app that tried to detect faces and output that fact onto a small screen. If you like I can share the code with you in another post.
