I am trying to pick up some Swift to help me with a project I want to work on so I figured I would dive in with a basic tutorial to get my feet wet in the language and remember what Xcode looks like.
I decided to follow a (since deleted) tutorial – the purpose of which was to build a really basic table that would get data in from your controller.
Even though the tutorial covered everything you needed to get by, there have been a few changes to how Swift works since it was written and also a few things they take for granted (like you knowing where certain views are inside Xcode).
The first two stumbling block I hit was that once I opened a storyboard file I didn’t know how to open the object library. When I searched for it the screenshots I found were from older versions of Xcode.
The next problem I faced was that once I had my table inside my view I was told;
Now we need to set up a delegate and data source for the table view. This is easy to do in interface builder. Just hold control, and then click and drag from the tableview to the “View Controller” object in your storyboard’s hierarchy, and select ‘data source’. Repeat with the ‘delegate’ options.
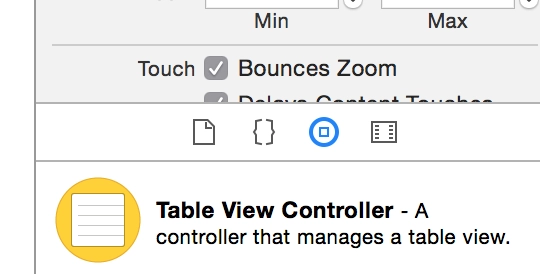
I could not find this storyboard hierarchy to save my life! Some more searching and I found what I needed, for reference it is this little black icon.
![]()
Now with my Xcode woes out of the way I was able to down to actually typing some code (as a vim user all this clicking and dragging was very disturbing!)
The code we were expected to have in our completed viewController file was;
import UIKit

class ViewController: UIViewController, UITableViewDataSource, UITableViewDelegate {

  override func viewDidLoad() {
    super.viewDidLoad()
    // Do any additional setup after loading the view, typically from a nib.
  }

  override func didReceiveMemoryWarning() {
    super.didReceiveMemoryWarning()
    // Dispose of any resources that can be recreated.
  }

  func tableView(tableView: UITableView!, numberOfRowsInSection section: Int) -> Int {
    return 10
  }

  func tableView(tableView: UITableView!, cellForRowAtIndexPath indexPath: NSIndexPath!) -> UITableViewCell! {
    let cell: UITableViewCell = UITableViewCell(style: UITableViewCellStyle.Subtitle, reuseIdentifier: "MyTestCell")

    cell.text = "Row #\(indexPath.row)"
    cell.detailTextLabel.text = "Subtitle #\(indexPath.row)"

    return cell
  }
}
There are a few issues with this. The first is that you will see in our two tableView functions we are appending ! to several parameters.
The interface around this has changed so you need to remove these bangs.
The second issue is that UITableViewCell now has what is known as optional chaining. When querying properties that can return nil they should be asked for with a question mark.
Finally, you cannot just call .text on a UITableViewCell any more, you need to go through textLabel? first.
This makes my completed and working code for those two functions to be;
func tableView(tableView: UITableView, numberOfRowsInSection section: Int) -> Int {
  return 10
}

func tableView(tableView: UITableView, cellForRowAtIndexPath indexPath: NSIndexPath) -> UITableViewCell {
  let cell: UITableViewCell = UITableViewCell(style: UITableViewCellStyle.Subtitle, reuseIdentifier: "MyTestCell")

  cell.textLabel?.text = "Row #\(indexPath.row)"
  cell.detailTextLabel?.text = "Subtitle #\(indexPath.row)"

  return cell
}
I really hope this helps other people that are struggling to work with very useful but slightly out of date tutorials.